How to Optimally Remodel a Bathroom for a Handicapped User
June 6, 2015
If you have recently become handicapped or are simply moving into a new home, you’ll quickly find that the two of the most problematic rooms in a given house are the kitchen and bathroom. Both of these will probably need to undergo a good deal of remodeling to become easily accessible, but though changing your kitchen can be a complex, time-intensive process (lowering counters, updating appliances, widening doorways…), getting your home’s bathroom ready will likely require the most dramatic remodeling work of any room in your home. There is a great deal that needs to be changed to make the average bathroom handicap accessible. Some of these changes are cheap and easy, but others are considerably more challenging to complete. Regardless, every one of the issues described below will likely need to be addressed. Not only that, but they’ll need to be taken care of quickly. Leave a bathroom in a state of flux for too long and you’ll open yourself up to a whole host of problems, including the possibility great personal injury. Here are a few of the changes you should consider making to your bathroom today:
- Expanding the doorway. Beginning with one of the more labor intensive steps, making the doorway to your bathroom larger will almost certainly be necessary if the room is to be accessed by a person confined to a wheelchair or walker. To be safe, be sure the doorway spans at least 36 inches.
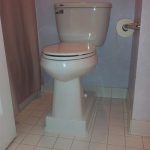
- Raise your toilet a few inches. Most toilets have seats which are about 15 inches off the ground, give or take a little. However, the minimum height for a toilet designed for handicapped individuals is 17 inches. You may even want to consider raising the seat a bit more, to a height of 19 inches.
- Keep an eye on the area under your sink. Few sinks in this world are ideal for handicapped users. Usually, they have something beneath them: pipes perhaps, or maybe a storage space. Whatever is underneath your sink, it’ll need to be done away with should a wheelchair-bound user be able to operate it comfortably. To use a sink properly, a person confined to a wheelchair will need to be able to get their legs underneath it, allowing their arms to reach the controls. Bear in mind that you also may have to slightly raise or lower your sink. Though this is often not the case, your sink might in fact be a bit high for someone in a wheelchair to comfortably use. On the other hand, handicapped users who rely on walkers to enhance their mobility will generally needs sinks to be raised higher by a few inches, allowing them easier access. Expect to have to raise said sink approximately three inches or so.
- Replace all knobs with levers. For many handicapped people, operating a standard, knob-based sink can be a challenge. In place of these knobs you should install a simple lever, one which can be operated without strain or effort. You may also want to consider installing said levels in other places as well. For example, door knobs can likewise be a hassle for handicapped users, so installing a similar lever as a door-opening mechanism can be a great idea. While lever-based controls may not be available for showers, you should still replace any and all knobs and dials present, as well as installing a handheld wand instead of a traditional shower head.
- Checking your turning radius. For a wheelchair-bound user, the ability to make a full turn once they have entered the bathroom is a necessary one. Be sure that your bathroom has no less than 60 inches of clear space in its center to allow for easy maneuvering.
- Install grab bars wherever necessary. There are two places in a handicap-accessible bathroom where grab bars are absolutely mandatory. Firstly, two must be placed on either side of the toilet to allow the user to lower and raise themselves. Secondly, at least one must be installed in the shower to allow for simpler entry and exit, and to prevent falls. That being said, just because these are the only two necessary locations that doesn’t mean you shouldn’t install grab bars elsewhere. Place them where you feel they are needed. Having one beside the sink might be a good idea. Maybe placing one in the center of the room could be helpful as well. Simply use your best judgment in deciding.
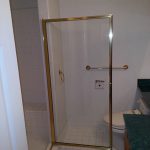
 Replace your shower door with a vacuum-sealed model. When it comes to deciding upon a shower door for a handicapped user, the most important thing is to purchase one which doesn’t require a great deal of force or effort to open and close. However, doors that are easy to open can be a burden as well, in that if little effort is applied to opening the door then little will probably be applied to closing it as well, a reality which could lead to leaking and problematically slippery bathroom floors. Install a vacuum-sealed door. They’re easy to open and close, and they do a fantastic job of keeping water where it should be.
 Replace your shower door with a vacuum-sealed model. When it comes to deciding upon a shower door for a handicapped user, the most important thing is to purchase one which doesn’t require a great deal of force or effort to open and close. However, doors that are easy to open can be a burden as well, in that if little effort is applied to opening the door then little will probably be applied to closing it as well, a reality which could lead to leaking and problematically slippery bathroom floors. Install a vacuum-sealed door. They’re easy to open and close, and they do a fantastic job of keeping water where it should be.
- Pay special attention to your tub or shower’s curb/step-up. Getting into a typical shower and/or bathtub can prove exceedingly difficult for a handicapped user. Be sure to lower the curb as much as possible to allow for easy access. Special walk-in tubs are a fantastic purchase for users with mobility issues. However, bathtubs may not be a great idea for the wheelchair-bound. Consider sticking with a shower, and removing the curb completely for easier access.
No one would say that remodeling a bathroom for a handicapped user is easy, but with a bit of work and a little patience the job can certainly be accomplished. Follow the above suggestions carefully and you’ll soon be in possession of a fantastic, handicap-accessible bathroom.